Are you new to DaVinci Resolve and want to learn how to add titles to your videos? This video tutorial is a step by step guide showing you how to just that.

Are you new to DaVinci Resolve and want to learn how to add titles to your videos? This video tutorial is a step by step guide showing you how to just that.

Hello there, today we will be showing you how to install Motion Graphics templates inside DaVinci Resolve from Allavio. It’s a fairly simple process, as we will simply be copying files that were downloaded and placing them in the correct folder so it can be used inside DaVinci Resolve. We will explain the steps for Windows users first and then for the Mac OS.
For Windows users let’s open up Resolve and click on the fusion tab. Next click on the effects library. Next click on the Arrow left of edit template. These are the folders where we will be copying the template files to. Since we have downloaded a transition, we will be placing them in the transitions folder. similarly if we downloaded a title pack we would copy the files to the titles folder. Same for generators and effect. Let’s head to file explorer and open our downloaded files. Select all the files inside and drag them over to the transitions folder. Now all the files are placed correctly for resolve to find them.
For Mac OS users the process is the same. Let’s go to the fusion tab. Click on the effects library, then select the edit templates folder. Then come over here to click on the ellipsis Icon. Then click on show folder. This will show the folder where we are supposed to add our files. Simply drag this folder to your favorites for easier acccess. Now open the purchased template, unzip the zip file, go inside the folder, select all the files. On your keyboard, press CMD + C to copy.
Now come to favorites and select the edit folder. Now depending on what type of product you have purchased you will need to place it in the correct folder if you have downloaded titles select the titles folder, if transitions then select the transition folder. Same with the effects and generators. Since this is a transition pack, place it in the transitions folder and that’s it for the installation.
After this if you have resolve open, you can exit out of it and restart the application. Next go inside Resolve and click on effects Library, then click on the video transitions. Since we’ve installed a transition pack it will come under this pane. Similarly if we had installed the title pack it would show under the titles pain. Resolve does not allow us to place entire folders in here, hence we have to differentiate our product title so it’s easier to find.
All products from Allavio will follow a similar pattern . All of our products follow this format: “A- product name, template name. The A is for Allavio. In the search box type a dash space and the name of the product you purchase and the products will be filtered by that time. Since we installed the modern transition pack, I will type “A- Modern” and now all the transitions inside that pack will show.
Now you can drag and drop them onto your templates and that’s all there is to it. If you want to learn how to add and use transitions, check out this tutorial from Allavio. How to add Transitions inside DaVinci Resolve.
If you want to learn how to add and use transitions, check out this tutorial. Thanks for watching and please visit our Youtube Page at Allavio Media for more DaVinci Resolve tutorials, and visit Allavio.com for motion graphic templates for DaVinci Resolve.
Inside your timeline, select the middle point between 2 video clips, image, or titles. It should become highlighted in red color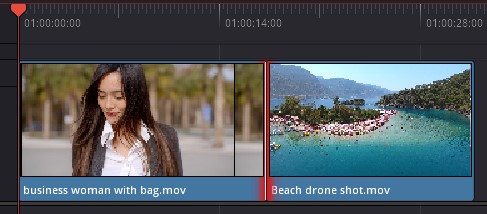
Inside the Video Transitions tab, find your transition. Right click on the transition, and select Add to Selected Edit Points & Clips.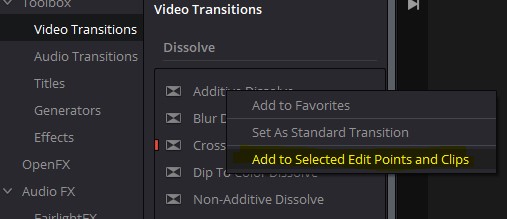
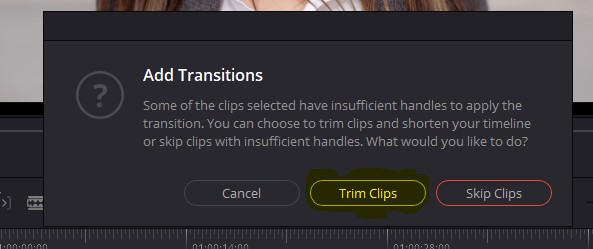
A pop up window will ask you to select options on how to apply the transition. Click on Trim Clips. The transition should now be added to your video clips.